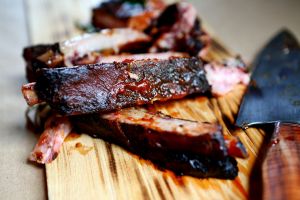
Source: Marianna Massey / Getty
This recipe needed a name when I first published it, and Doug and Trudy Calvin of Palm Springs, CA provided it. He wrote “I fixed ribs yesterday by following your recipe. My girlfriend made me promise that for her last meal on this planet I would fix the same ribs.”
Makes. 1 slab, enough for 2 adult servings
Preparation time. 15 minutes minimum. 10 minutes to skin ‘n’ trim, 5 minutes to rub, 1 to 2 hours dry brining is optional.
Cooking time. 3 hours minimum. We will be cooking low and slow at about 225°F, so allow 5 to 6 hours for St. Louis Cut (SLC) ribs and 3 to 4 hours for baby back ribs. Thicker, meatier slabs take longer, and if you use rib holders so they are crammed close to each other, add another hour. Country ribs are really not ribs, they are chops and should be cooked very differently. Begin by learning how to set up your grill by reading my article on 2-zone or Indirect cooking. That means that one side is hot and the other is not. This is the single most important technique a pitmaster must learn. Then set up your grill for a meatless trial run so you can learn how to tweak the dials and vents to get it to 225°F. If you have a gas grill, use only one burner as described in my article setup for a gas grill. Put a disposable aluminum pan with water on top of the hot burner(s). Moisture and combustion gases in a propane grill combine to create a seductive, bacon-like flavor in the meat. If it has only one burner, put the water pan between the meat and the burner. If you have a Weber kettle, put about half a chimney of unlit coals in the grill and put about half a chimney of fully lit coals on top to get to 225°F. I recommend you use a water pan. All this is described in detail in my article on the best setup for a charcoal grill. If you have an offset firebox smoker, follow my instructions for setting up an offset smoker. If you have a bullet smoker like the Weber Smokey Mountain, read my article bullet smoker setup.
Total time. 3 to 4 hours for baby backs, 5 to 6 hours for spare ribs and St. Louis Cut ribs.
1) Rinse. Rinse the ribs in cool water to remove any bone bits from the butchering and any bacterial film that grew in the package (don’t worry, cooking will sterilize the meat).
2) Skin ‘n’ trim. If the butcher has not removed the membrane from the under side, do it yourself. It gets leathery and hard to chew, it keeps fat in, and it keeps sauce out. Insert a butter knife under the membrane, then your fingers, work a section loose, grip it with a paper towel, and peel it off. Finally, trim the excess fat from both sides. If you can’t get the skin off, with a sharp knife, cut slashes through it every inch so some of the fat will render out during the cooking. Click here to see more photos of how to skin ‘n’ trim.
3) Salt. Salt is important. Even if you are watching your salt intake, a little salt really helps. It penetrates deep and amplifies flavor. It helps proteins retain moisture. And it helps with bark, the desired crust on the top formation. If you can, give the salt 1 to 2 hours to be absorbed. The process of salting in advance is called dry brining. The rule of thumb is 1/2 teaspoon of kosher salt per pound of meat, but ribs are about 50% meat, so use about 1/4 teaspoon per pound. You can simply eyeball it by sprinkling on the same amount of salt you would sprinkle on the ribs if they were served to you unsalted. If time permits, get the salt on about 1 to 2 hours before cooking.
4) Rub. Then coat the meat with a thin layer of water. The water helps dissolve the spices. Sprinkle enough Meathead’s Memphis Dust to coat all surfaces but not so much that the meat doesn’t show through. That is about 2 tablespoons per side depending on the size of the slab. Spread the Memphis Dust on the meat and rub it in. Some folks insist on putting the rub on the night before, but it isn’t necessary.
5) Set up your cooker for 2-zone or indirect cooking.
6) Adjust the temp. Preheat your cooker to about 225°F and try to keep it there throughout the cook. This is crucial: You can absolutely positively noway nohow rely on bi-metal dial thermometers. Even if you spent a fortune on your grill they mount unreliable thermometers on them. If you are not monitoring your cooker with a good digital oven thermometer, you are setting yourself up for disappointment. Using a dial thermometer is like trying to send email with a typewriter. Click here to read my buyer’s guide to thermometers.
On a charcoal grill, adjust the air intake dampers at the bottom to control heat on charcoal grills. Intake dampers are more effective than exhaust dampers for controlling the temp because they reduce the supply of oxygen to the coals. Take your time getting the temp right. Cooking at 225°F will allow the meat to roast low and slow, liquefying the collagen in connective tissues and melting fats without getting the proteins knotted in a bunch. It’s a magic temp that creates silky texture, adds moisture, and keeps the meat tender. If you can’t hit 225°F, get as close as you can. Don’t go under 200°F and try not to go over 250°F. Click here for more about how to calibrate your grill. To learn more about what happens inside the meat when it is cooking read my article on meat science. Read my article on the thermodynamics of cooking to learn how different grills cook differently.
7) Smoke. For charcoal or gas cookers, add 4 ounces of wood at this time. On a gas grill, put the wood as close to the flame as possible. On a charcoal grill, put it right on the hot coals. Resist the temptation to add more wood. Nothing will ruin a meal faster and waste money better than oversmoked meat. You can always add more the next time you cook, but you cannot take it away if you oversmoke.
8) Relax. Put the slabs in the cooker on the indirect side of the grill, meaty side up. Close the lid and go drink a beer, read a book, or make love.
9) More smoke. When the smoke dwindles after 20 to 30 minutes, add another 4 ounces of wood. That’s it. Stop adding wood. If you have more than one slab on, halfway through the cook you will need to move the ribs closest to the fire away from the heat, and the slabs farthest from the flame in closer. Leave the meat side up. There is no need to flip the slabs. You can peek if you must, but don’t leave the lid open for long.
10) The Texas Crutch. This trick involves wrapping the slab in foil with about an ounce of water for up to an hour to speed cooking and tenderize a bit. Almost all competition cooks use the crutch to get an edge. But the improvement is really slight and I never bother for backyard cooking. If you crutch too long you can turn the meat to mush and time in foil can soften the bark and remove a lot of rub. I recommend it only for competition when the tiniest improvement can mean thousands of dollars. Skip it and you’ll still have killer ribs. But if you’ve seen it on TV and must try it, click here to learn more about The Texas Crutch.
http://amazingribs.com/recipes/porknography/best_BBQ_ribs_ever.html < Read More here


